





I have to longest "To Do List" today. Am, I'm happy to announce that one of those things just got crossed off! I helped my friend Denise at Whimsy Couture by editing one of her patterns. I got to a point that I got technologically stuck (ie - my computer wouldn't do what I wanted it to do and I thought about throwing it out the window). I did finally get buckled down and beat my computer into submission. I just sent that pattern off to her and I hope its exactly what she wanted!
Next, I'm going to head upstairs and face my fear of piping and finish this apron pattern if it kills me! (if you don't hear from me for a couple days send in a search party!).
THEN - the thing I have putting off for way too long - TAXES. As much as I procrastinate this you would think I did them myself. But, no, I just take them to an accountant and let them do all the work. The thing is, for the second year in a row I know we are going to owe money - I don't want to pay it. So, there it is. I don't want to get my stuff out, I don't want to take it to the accountant and I don't want to bite my nails until Mr. Taxman tells me how much we owe and most of all I don't want to write that check!
Ok - off to the sewing room to put off the tax thing - ha!
Hope you are all having a very productive, cross off your "To Do List" kinda weekend!
Sunday, March 21, 2010


Thursday, March 18, 2010
My Friend Debbie
My friend Debbie passed away a couple days ago. Her wake was tonight. I'm really sad. I'm sad for Debbie's husband, I'm sad for her kids, I'm sad for her parents, I'm sad for her sister, I'm sad for her friends.... I'm just sad.
I call Debbie my friend even though I didn't know her that well. I wish I had. She was such an amazing person. I am friends with Debbie's sister and some of Debbie's other close friends who are expecting 400 people for a reception after the funeral tomorrow morning. 400 people will come out to honor her amazing spirit.
Debbie died of breast cancer. Debbie was 31 years old. 31. Debbie left behind a loving husband and 3 small children 6, 4, and 2. She found a lump while doing a self breast exam. She found out that she had stage 3 breast cancer and started chemo. She found out after she started chemo that she was pregnant. Doctors recommended that she terminate the pregnancy to resume her chemo, they told her it was her only chance and that because of the chemo she had already had there would likely be complications with her baby. Debbie quit her chemo and had her third beautiful son. He is perfect, he is wonderful, and there is not one thing wrong with him. Within days of her c-section Debbie had a double mastectomy and for the next 3 years she fought for her life. Debbie is at peace now, she will suffer no more.
So, today I am taking a break from blogging about crafts to honor Debbie and her memory and to remind each of you - do your self breast exams, live your lives with courage, do not take one minute for granted, kiss your kids and extra 100 times today, tell your husband you love him, call your mom and dad, and live your faith.
I call Debbie my friend even though I didn't know her that well. I wish I had. She was such an amazing person. I am friends with Debbie's sister and some of Debbie's other close friends who are expecting 400 people for a reception after the funeral tomorrow morning. 400 people will come out to honor her amazing spirit.
Debbie died of breast cancer. Debbie was 31 years old. 31. Debbie left behind a loving husband and 3 small children 6, 4, and 2. She found a lump while doing a self breast exam. She found out that she had stage 3 breast cancer and started chemo. She found out after she started chemo that she was pregnant. Doctors recommended that she terminate the pregnancy to resume her chemo, they told her it was her only chance and that because of the chemo she had already had there would likely be complications with her baby. Debbie quit her chemo and had her third beautiful son. He is perfect, he is wonderful, and there is not one thing wrong with him. Within days of her c-section Debbie had a double mastectomy and for the next 3 years she fought for her life. Debbie is at peace now, she will suffer no more.
So, today I am taking a break from blogging about crafts to honor Debbie and her memory and to remind each of you - do your self breast exams, live your lives with courage, do not take one minute for granted, kiss your kids and extra 100 times today, tell your husband you love him, call your mom and dad, and live your faith.
Wednesday, March 17, 2010
I love doing MacKenzie's hair - she on the other hand, HATES for me to do her hair. By some miracle she actually let me do her hair 2 days in a row! She had 2 Saint Patrick's Day shirts to wear this year so we had to do 2 different Saint Patrick's Day hairdo's!
Yesterday we did a 3 leaf clover:

And today we did a 4 leaf clover:

I know that this picture is not the best, but I hope that you can see it. I was just happy she let me do it!
So - wanna know how I did it??? Head on over to Adopt a 'Do. She has some of THE COOLEST ideas for hair for little girls and little girls at heart. She also has some great tween hairstyle and fantastic ones for short styles too. These are so suprisingly easy, especially the ones with videos!! yes! VIDEOS! for FREE!!!!
I hope you love her site as much as I do.
Janel
Yesterday we did a 3 leaf clover:

And today we did a 4 leaf clover:

I know that this picture is not the best, but I hope that you can see it. I was just happy she let me do it!
So - wanna know how I did it??? Head on over to Adopt a 'Do. She has some of THE COOLEST ideas for hair for little girls and little girls at heart. She also has some great tween hairstyle and fantastic ones for short styles too. These are so suprisingly easy, especially the ones with videos!! yes! VIDEOS! for FREE!!!!
I hope you love her site as much as I do.
Janel
Tuesday, March 16, 2010
Sugar Cookie Tutorial part 2
Back to your regularly scheduled post! I finally got a chance to decorate those cookies today. So, lets just get started because this is going to be a long post.
First gather your ingredients for the icing. I use a glace icing instead of a royal type icing. Royal dries really really hard and it puts some people off and can sometimes have a funky taste because of the meringue powder. This glace dries firm and set but not rock hard and does not have the meringue powder taste.
I got this recipe from www.cakecentral.com as well - it is not an original recipe of mine.
 So, now its time to color your icing. I'm pretty passionate about this. I love COLOR! I love deep full color! To get that color you MUST use a gel food coloring. The liquid stuff that you buy in the grocery store is NOT GOING TO WORK. It will water down the icing and change the whole consistency, you will not get the color saturation that you want. So, definately go to your local craft store and buy the Wilton gel - it lasts forever and you get great color.
 So, now I have my icing mixed - green and white only for this project and I have all my cookies layed out on my countertop with easy clean up parchment paper covering my countertop. In case you forgot - I love parchment paper!
 This is another technique that I love to use. You can add so much character and depth to your cookies. First you outline your cookie and then you flood your cookie and then you take another color of flood icing and just place small drops on the wet main color. The drops will sink into the main color looking like polka dots.
 Now you want to grab a toothpick and drag the pick from the top of the dot all the way through to the bottom and you get a great heart - CUTE!

First gather your ingredients for the icing. I use a glace icing instead of a royal type icing. Royal dries really really hard and it puts some people off and can sometimes have a funky taste because of the meringue powder. This glace dries firm and set but not rock hard and does not have the meringue powder taste.
I got this recipe from www.cakecentral.com as well - it is not an original recipe of mine.

Glace Recipe:
4 cups powdered sugar
4 Tablespoons light corn syrup
4 Tablespoons milk
1/2 teaspoon clear extract flavoring (I used almond)
Mix all ingredients together. If it is feeling too stiff add more corn syrup or a little more milk.
When thinning your icing make sure that you go slow - too much and then you have to add more powdered sugar etc... vicious cycle (not that *I* would know about that! haha!)
This recipe gives you a slightly clear looking icing. To make it have more color and body add 20 drops of White food color. Wilton makes a white that you can get at your local craft store - I use A LOT of white so I purchased a BIG bottle.
 So, now its time to color your icing. I'm pretty passionate about this. I love COLOR! I love deep full color! To get that color you MUST use a gel food coloring. The liquid stuff that you buy in the grocery store is NOT GOING TO WORK. It will water down the icing and change the whole consistency, you will not get the color saturation that you want. So, definately go to your local craft store and buy the Wilton gel - it lasts forever and you get great color.
 So, now I have my icing mixed - green and white only for this project and I have all my cookies layed out on my countertop with easy clean up parchment paper covering my countertop. In case you forgot - I love parchment paper!
I like to use disposible pastry bags (purchased at your local craft store) and I also like to use piping tips (I use a number 3) - if you don't have these things you can use a zippy bag with the corner cut off. The icing that you will use in a pastry bag will be thicker icing for the outlines.

Next you will want to thin the remaining icing. To do this you can just add a little bit of water and stir. Check for consistency by dropping a glob back into the bowl - if the glob disappears by the count of 3 you should be good. Quicker than that and it might be too thin, longer than that and it might be too thick.
 These were the 2 that I did and then I filled the middles with the "flood" icing.

Next you will want to thin the remaining icing. To do this you can just add a little bit of water and stir. Check for consistency by dropping a glob back into the bowl - if the glob disappears by the count of 3 you should be good. Quicker than that and it might be too thin, longer than that and it might be too thick.
I use these squeeze bottles for my "flood icing". I think it makes it much easier to control, especially when you are using mulitple colors for each cookie.

Outline your cookies. I like to outline them all at once.
 If you want to use sugars there are a couple ways to do this. The main thing to remember is this - sugar will stick to whatever is wet. So, if you have wet icing on your cookie - that is where the sugar is going to stick. And, in the exact opposite it will not stick to anything that is dry - so icing that is dry or a cookie with no icing on it etc....
 Here I have taken a cookie that I outlined - outlined only and then I poured the sugar all over the cookie making sure to completely cover the edges where the outline was. I left this to dry for a while just like this. The middle of this cookie does not have anything on it, so even though the sugar is sitting there, its not going to stick there.
 Once dry, I shook off the excess (kinda like glitter!) - and this is what I was left with - pretty....

Outline your cookies. I like to outline them all at once.
 If you want to use sugars there are a couple ways to do this. The main thing to remember is this - sugar will stick to whatever is wet. So, if you have wet icing on your cookie - that is where the sugar is going to stick. And, in the exact opposite it will not stick to anything that is dry - so icing that is dry or a cookie with no icing on it etc....
I personally hate the shaker part of the sugar topper so I take those off immediately and then I pour all the sugar into a small plastic container.
 Here I have taken a cookie that I outlined - outlined only and then I poured the sugar all over the cookie making sure to completely cover the edges where the outline was. I left this to dry for a while just like this. The middle of this cookie does not have anything on it, so even though the sugar is sitting there, its not going to stick there.
 Once dry, I shook off the excess (kinda like glitter!) - and this is what I was left with - pretty....
 These were the 2 that I did and then I filled the middles with the "flood" icing.
 This is another technique that I love to use. You can add so much character and depth to your cookies. First you outline your cookie and then you flood your cookie and then you take another color of flood icing and just place small drops on the wet main color. The drops will sink into the main color looking like polka dots.
 Now you want to grab a toothpick and drag the pick from the top of the dot all the way through to the bottom and you get a great heart - CUTE!
 Here is another version of the same technique - use 2 (or more) colors of flood consistency icing and make stripes (any direction that you want).
 Grab a toothpick and drag the pick through the icing back and forth (picking up the pick at each end) in the opposite direction of your stripes. (stripes are vertical, drag pick horizontal). You will get this really cool effect:
 Here are all my cookies done and decorated - use your imagination and go crazy! Hopefully I will have time to decorate some easter cookies and get some more variety of color.
Make sure to let them dry completely before trying to move them - usually takes about 12 hours. Plan ahead!
I think they look fantastic and tomorrow morning I am going to be Rock Star Wife #1 at my hubby's work!  I hope these tutorials have helped you move past stress and fear of sugar cookies - they can be so much fun - and YUMMY!!! Let me know if you use any these ideas - I would love to see your crafty cookies! (If there are any left to take pics of!)
Monday, March 15, 2010
Post Interrupted
Tonights post, Sugar Cookie Tutorial part 2, is being interrupted due to the dentist.
I had a dentist appointment late this afternoon and it just threw my whole day off. A 3:00 dentist appointment means I have to leave here at 2:30, I didn't get done until 4:00 - home at 4:30 - nothing planned for dinner???? See where I'm going with this. Its all the Dentist's fault - blame him! Yea.... blame the dentist! hehe!
Anyway - I am going to take the girl to school tomorrow and get the cookies decorated - then I'm going to test another sewing pattern!!! I'm so excited, I'm testing an apron pattern for Puking Pastilles. (Her stuff ROCKS! - seriously - check it out!).
So, tomorrow I have a big day - I need to go to bed!!
I had a dentist appointment late this afternoon and it just threw my whole day off. A 3:00 dentist appointment means I have to leave here at 2:30, I didn't get done until 4:00 - home at 4:30 - nothing planned for dinner???? See where I'm going with this. Its all the Dentist's fault - blame him! Yea.... blame the dentist! hehe!
Anyway - I am going to take the girl to school tomorrow and get the cookies decorated - then I'm going to test another sewing pattern!!! I'm so excited, I'm testing an apron pattern for Puking Pastilles. (Her stuff ROCKS! - seriously - check it out!).
So, tomorrow I have a big day - I need to go to bed!!
Sunday, March 14, 2010
Sugar Cookie Tutorial part 1
In part 1 of this tutorial I am going to explain how to make and bake the sugar cookies. I think this is the most stressful part of sugar cookies.
First - start with a great recipe! Hopefully this link will work - this is the No Fail Sugar Cookie recipe. Not only does it taste good, it holds its shape during baking.
 Make sure to chill your dough for at least 2 hours, preferrably overnight. Then you will need to let it sit out for about 30 minutes so that it will be elastic enough to roll out.
Some people roll their dough between 2 pieces of parchment paper before they refrigerate. I've tried this method and it doesn't work well for me personally. I wish it would, would be much less messy. So, if you can get that to work - go for it!

Your next step is going to be rolling out your dough. I roll directly on my countertop. We have granite countertops so its a smooth surface that is easy to clean.


Cut the cookies out as close together as you can - maximize the effort involved with rolling out the dough!

Make sure to line your cookie sheets with parchment paper. I love parchement paper. It keeps your cookie sheets clean, there by reducing the chance of your cookie sheets rusting and it makes them last longer. It keeps your cookies from sticking and keeps them from getting brown or burnt on the bottoms. I LOVE parchment paper!
I only set my timer for about 6 minutes and then I check them from there and add a minute or 2 if needed. I really don't like my cookies to get overbaked. As soon as they start to look brown on the edges (I mean just barely toasted) I take them out.
For those that have left a comment or anyone that does leave a comment - leave me your email and I'll share another super secret tip to sugar cookies that makes all the difference in the world!! (If you've already left a comment, leave me an email address and I will email it to you!)
This post is linked to "Anti-Procrastination Tuesday's" at New Nostalgia"
First - start with a great recipe! Hopefully this link will work - this is the No Fail Sugar Cookie recipe. Not only does it taste good, it holds its shape during baking.
Second - make sure to preheat your oven. Your oven needs to be hot to prevent the cookies from spreading.
A couple baking tips - make sure to follow your recipe to the T! Bring all of your ingredients to room temperature before starting to mix your dough. Use unsalted butter and all purpose flour unless other wise stated. Also - you can use any type of extract that you want to, vanilla, maple, peppermint, coconut, lemon - you name it!
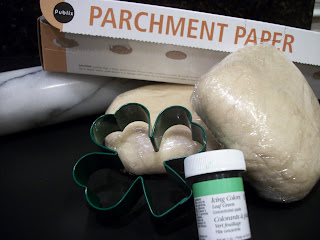
 Gather your hardware - Cookie sheets, rolling pin, parchment paper, cookie cutters, chilled cookie dough and food coloring and ingredients for your icing (tutorial on decorating and finishing touches coming tomorrow).
 Make sure to chill your dough for at least 2 hours, preferrably overnight. Then you will need to let it sit out for about 30 minutes so that it will be elastic enough to roll out.
Some people roll their dough between 2 pieces of parchment paper before they refrigerate. I've tried this method and it doesn't work well for me personally. I wish it would, would be much less messy. So, if you can get that to work - go for it!

Your next step is going to be rolling out your dough. I roll directly on my countertop. We have granite countertops so its a smooth surface that is easy to clean.
If you have problems getting your dough rolled out evenly you can buy strips of wood that are 1/2 or 1/4 inch thich and use them to roll out - or you can buy guides that go on your rolling pin to keep the dough even.

Now - grab your cookie cutter(s). I am only doing shamrock for this tutorial. If you are using multiple cookie cutters, I recommend only baking like kinds of cookies. Different shapes have different points and different baking times. You don't want to have some burnt and some not cooked. Better to take longer to bake them than to not have them perfect.

Cut the cookies out as close together as you can - maximize the effort involved with rolling out the dough!

Make sure to line your cookie sheets with parchment paper. I love parchement paper. It keeps your cookie sheets clean, there by reducing the chance of your cookie sheets rusting and it makes them last longer. It keeps your cookies from sticking and keeps them from getting brown or burnt on the bottoms. I LOVE parchment paper!
Wax paper is NOT the same as parchment paper - wax paper actually has wax on it and will melt in the oven. Cookies and wax do not taste well together.
Make sure that your cookie sheet is room temperature. If it is even a little bit warm you cookies will spread.

I only set my timer for about 6 minutes and then I check them from there and add a minute or 2 if needed. I really don't like my cookies to get overbaked. As soon as they start to look brown on the edges (I mean just barely toasted) I take them out.
Allow them to cool for about 3 minutes on the cookie sheet and then transfer them to a cooling rack.

YUM! I cannot wait to decorate these. But, its 10:30, I'm tired and so they will get wrapped up and decorated tomorrow. I hope that this has helped you with some of the issues that you have when baking sugar cookies.

YUM! I cannot wait to decorate these. But, its 10:30, I'm tired and so they will get wrapped up and decorated tomorrow. I hope that this has helped you with some of the issues that you have when baking sugar cookies.
Let me know how your cookies come out and check back tomorrow for all the decorating tips!
For those that have left a comment or anyone that does leave a comment - leave me your email and I'll share another super secret tip to sugar cookies that makes all the difference in the world!! (If you've already left a comment, leave me an email address and I will email it to you!)
This post is linked to "Anti-Procrastination Tuesday's" at New Nostalgia"
Saturday, March 13, 2010
Alice - EAT THIS!
This is what I have been working on this week. My friend's daughter turned 11 and she took a bunch of girls to see Alice in Wonderland the movie.


I get most of my inspiration from the party theme and then I go search on Cake Central. This was no exception. This is the original cake. I'm pretty proud of this cake, I really like the way it turned out and this is only my second topsy turvy cake.
The cake is banana with chocolate ganache filling and icing, covered by fondant. Everything on the cake is edible.
I hope you enjoy!


I get most of my inspiration from the party theme and then I go search on Cake Central. This was no exception. This is the original cake. I'm pretty proud of this cake, I really like the way it turned out and this is only my second topsy turvy cake.
The cake is banana with chocolate ganache filling and icing, covered by fondant. Everything on the cake is edible.
I hope you enjoy!
Subscribe to:
Posts (Atom)


